How to Create an Action Map
When you’re working as an instructional designer—especially in a workplace setting—it’s important to always remember the goal isn’t just to deliver content and information to your learners. Instead, the goal is to create training and learning experiences that help improve performance and deliver results back to the organization. After all, that’s the very definition of instructional design.
But how do you go about creating performance- and results-driven training in a practical way? Well, this is where the process of action mapping can help!
Taking the time to create an action map can help you move away from creating training experiences that are boring information dumps and instead build learning experiences that are focused on what you need learners to do back on the job. And when you focus on what learners need to do, it further allows you to evaluate and measure those training efforts.
So, in this article, I’ll share an overview of how to create an action map step-by-step, along with examples and a free template you can use to start creating your own action map.
What is Action Mapping?
So, first, let’s ask and answer this question: What is action mapping? Well, if you’re new to instructional design or eLearning development, action mapping is a backwards design process created and written about by Cathy Moore in her best-selling book, Map It, as a way to identify specific behaviors your learners need to perform in order to achieve a specific and measurable goal.
And the thing that makes action mapping such a popular and effective process is that it shifts the focus toward what learners need to do to achieve a desired business goal. And, of course, it then helps you identify possible training activities you can create to teach those behaviors.
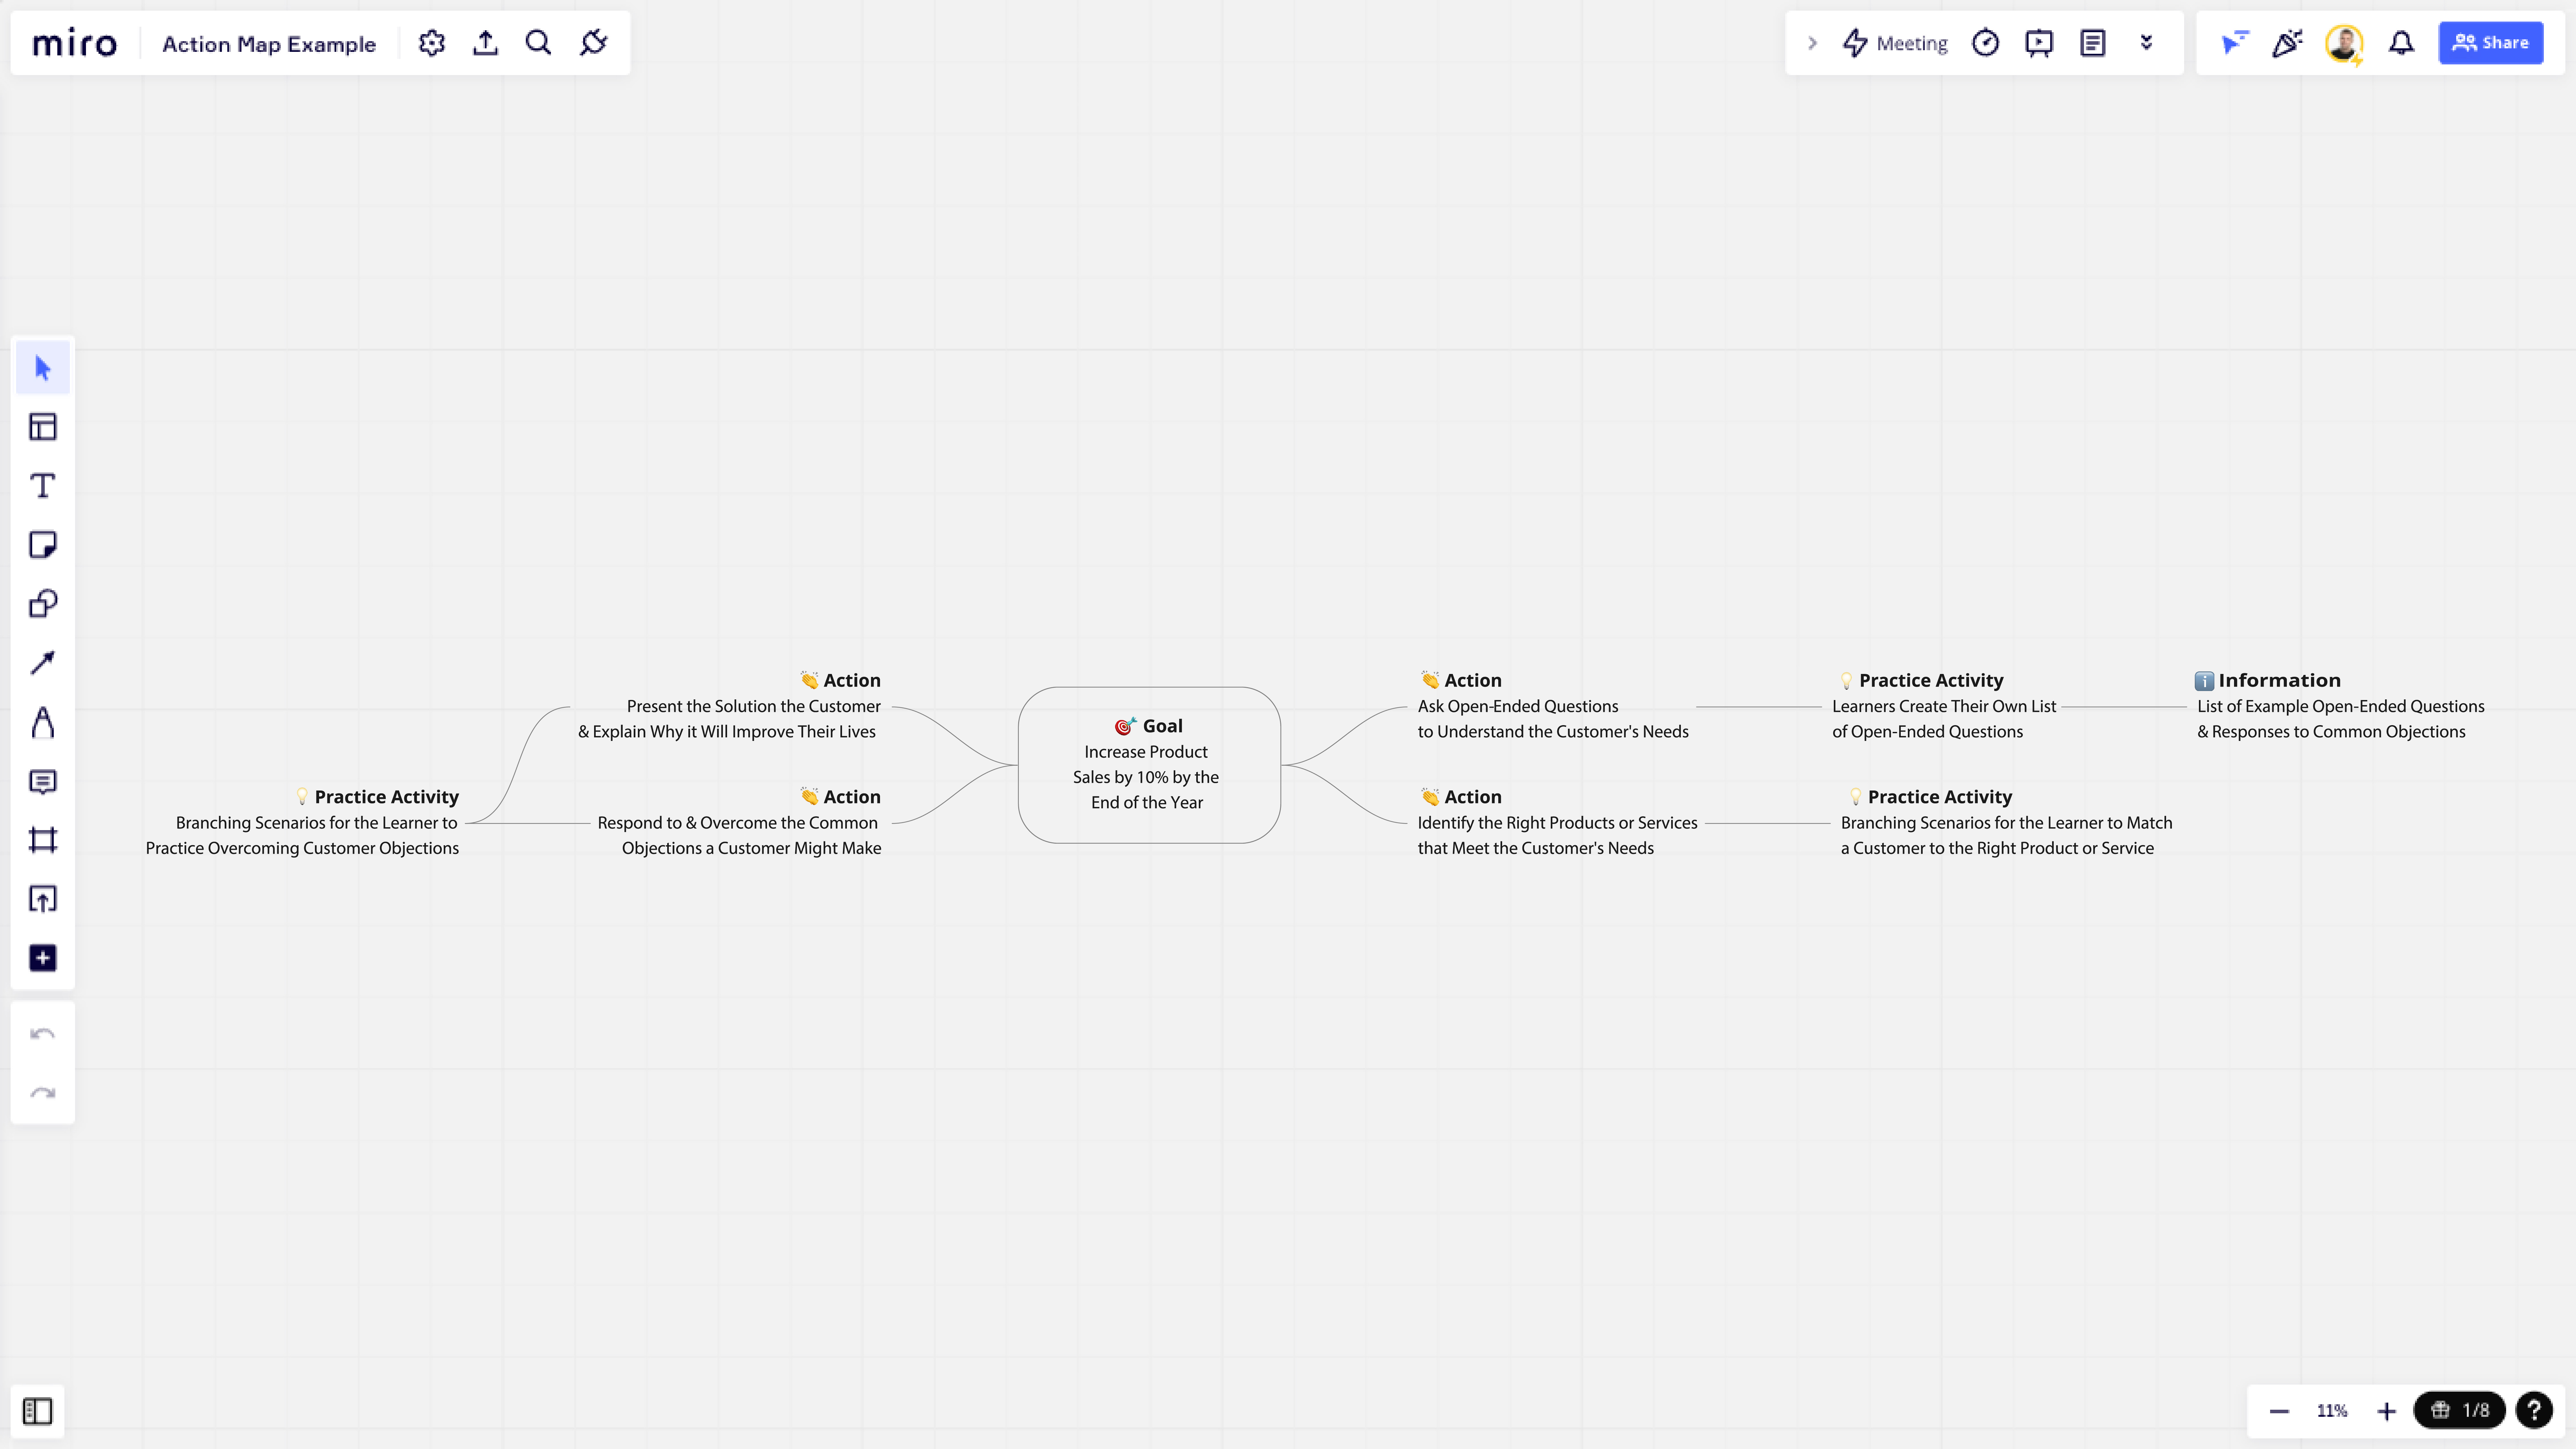
When Do You Create an Action Map?
So, now that we know what an action map is, the next logical question we need to ask and answer is: When should you create an action map during the instructional design process?
Whether you follow the ADDIE or SAM models, the first step in any instructional design project is to conduct a needs analysis. And as I’ve shared, a needs analysis is simply the process an instructional designer goes through to evaluate a performance issue to determine the root cause of that issue and offer one or more solutions that will hopefully resolve it—ideally in a measurable and evidence-based way.
Free Course: 10-Day Career Mindset Reset
Inside The eLearning Designer’s Academy, we think a little differently about professional development and career growth. Enroll in our free 10-Day Career Mindset Reset to start thinking differently about your skills, career, and confidence!
And because the process of creating an action map requires a measurable goal at the center of the map, I usually recommend creating an action map after you’ve conducted a needs analysis, identified the goals your stakeholders and subject matter experts are seeking to achieve, and validated that goal can be met (or at least partly met) with a training intervention. For some instructional designers, they include the creation of an action map as part of their instructional design kickoff meeting.
To put it in a nutshell, if we’re looking at this through the lens of the ADDIE model, creating an action map is usually the first step in the Design process.
So, now that we have all that context out of the way, how do you actually create an action map? Well, let’s look at the process step-by-step.
Step One: Define the Business Goals
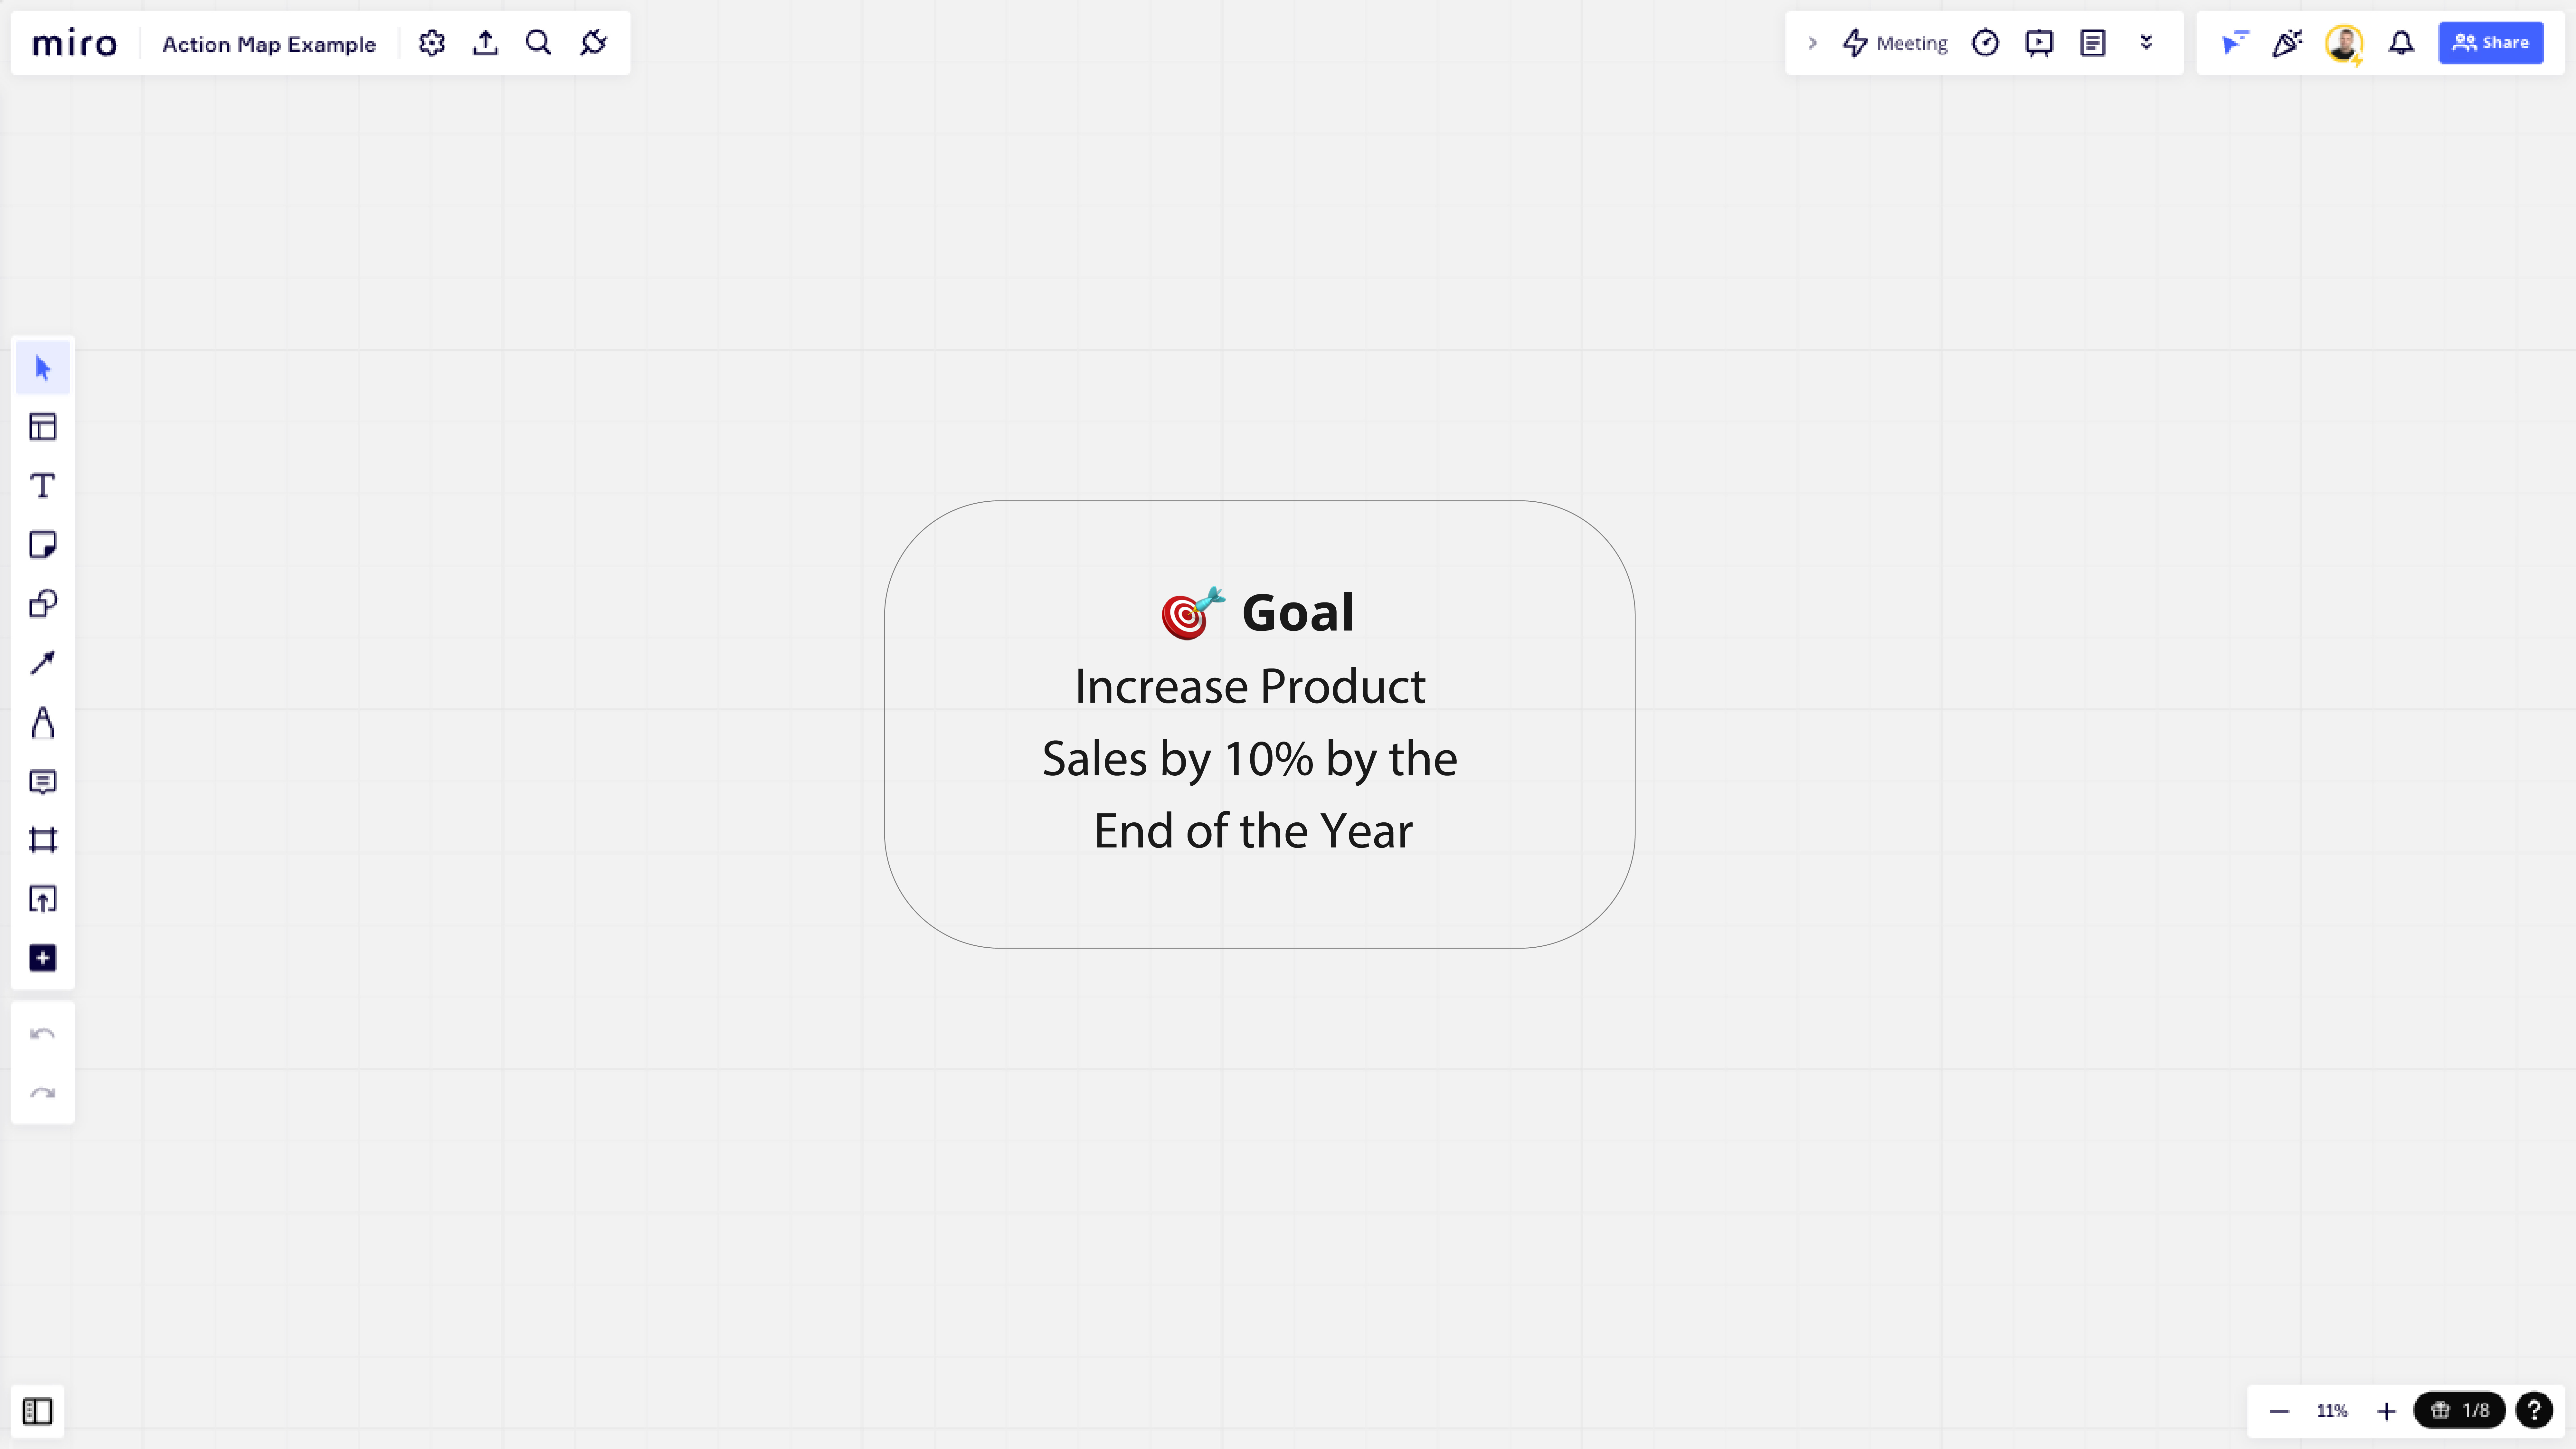
The first step for creating an action map is to define the business goal(s) you’re seeking to achieve. And as I shared above, defining your goal is something that will usually be accomplished following completion of your needs analysis. However, the difference here is that you want to get a bit more specific with your goal. And the question we really have to ask and be able to answer is, “What’s the specific change we want to see as a result of this training, and how can it be measured?”
Now, at this point, I don’t recommend you do this by yourself. In fact, if you’re able to, it’s my suggestion that you create your whole action map in collaboration with your stakeholders and subject matter experts, as it’ll also help them focus more on what learners need to do rather than what they need to know. And, of course, your completed action map does a great job visualizing how your training connects back to measurable outcomes.
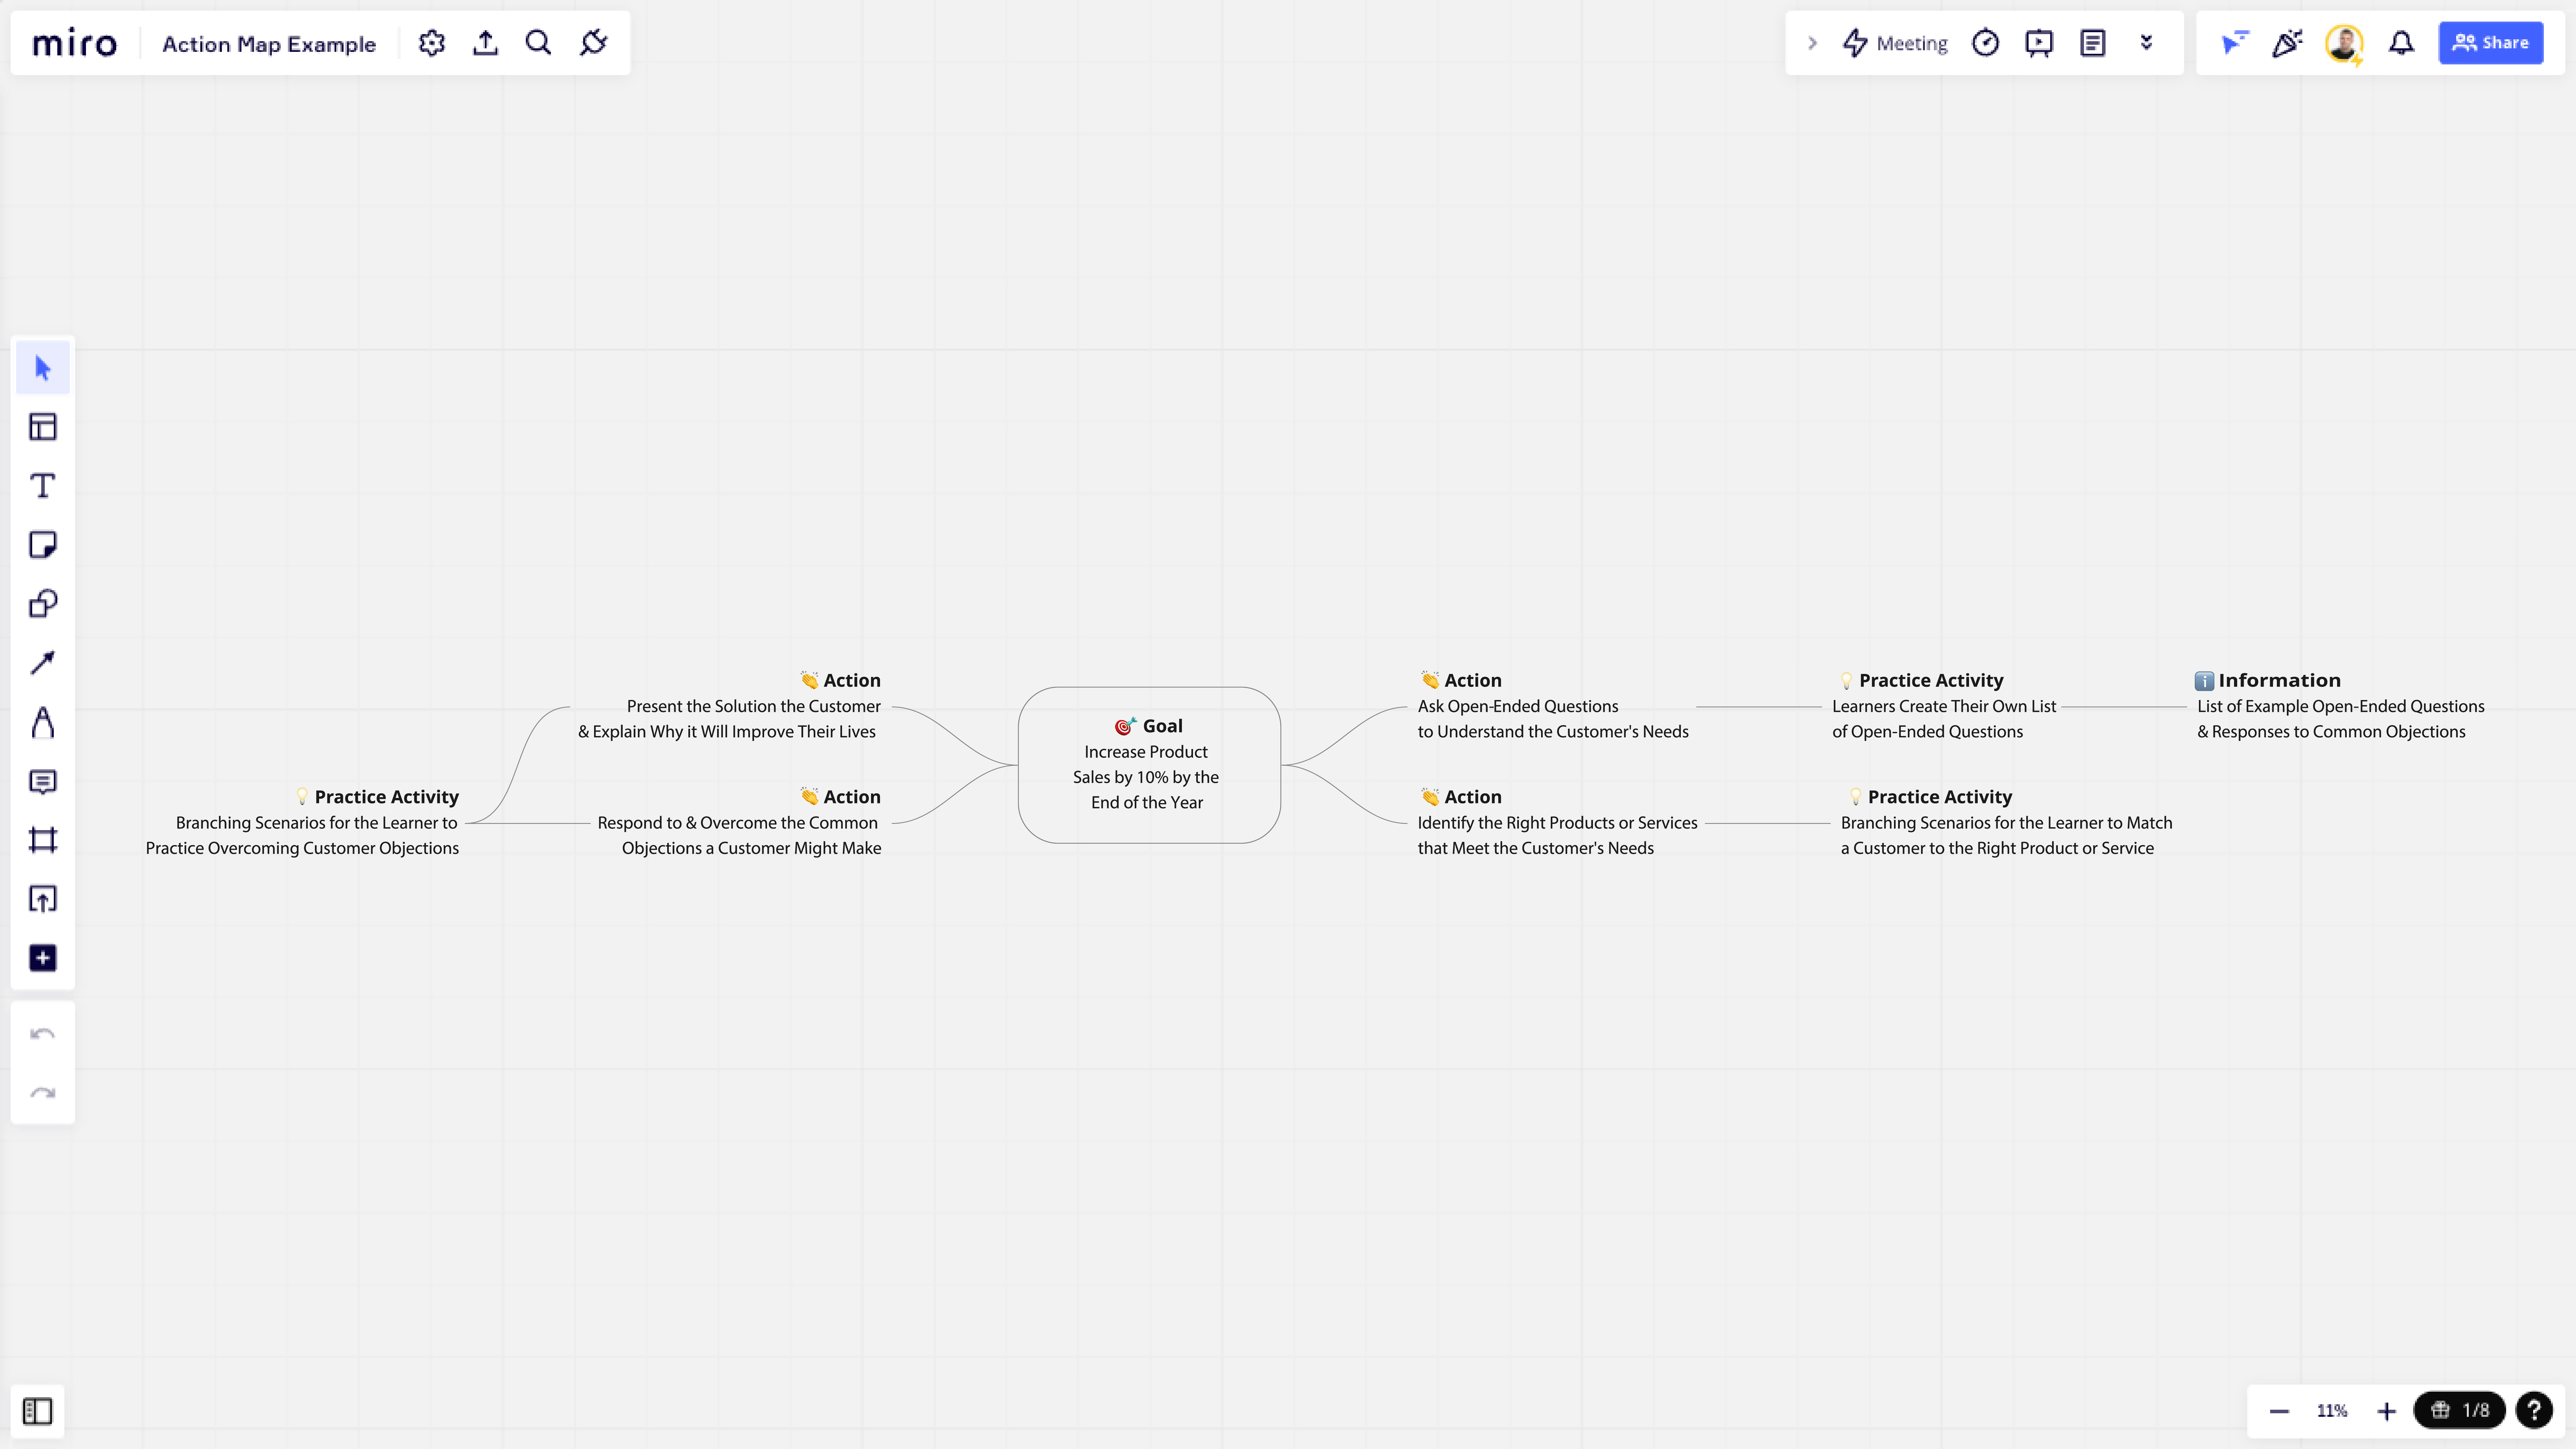
So, let’s say you’re working on a course for sales employees, and your stakeholders want these employees to learn how to sell more products. What might be the goal for that? Well, what we want to avoid are goals that are focused on knowledge. Instead, we want a goal that’s measurable and focuses on the business. This becomes important later when you work to evaluate the effectiveness of the training.
For example, if we look at these two goals below, you’ll notice one is a vague goal that focuses on increasing sales employee product knowledge, whereas the other is focused on specific, measurable business outcomes.
⛔️ Increase sales employee product knowledge.
✅ Increase product sales by 10% by the end of the year.
So, this specific and measurable goal becomes our goal at the center of our action map.
Now, before we continue, what do you do if you’re creating training on something that isn’t specific or measurable? Well, this is a common issue that many folks have when it comes to action mapping. However, the thing that you have to remember is the purpose of action mapping: To make a direct connection between training and measurable business outcomes.
And so, while action mapping is a very effective process to do just that, it also means that it’s not appropriate for every training project you might be working on. For example, if you’re working to design training that’s purely for the outcome of knowledge transfer and retention (with no specific behaviors or tasks that learners need to do with that information), then action mapping isn’t going to do you any good.
Step Two: Identify the Actions
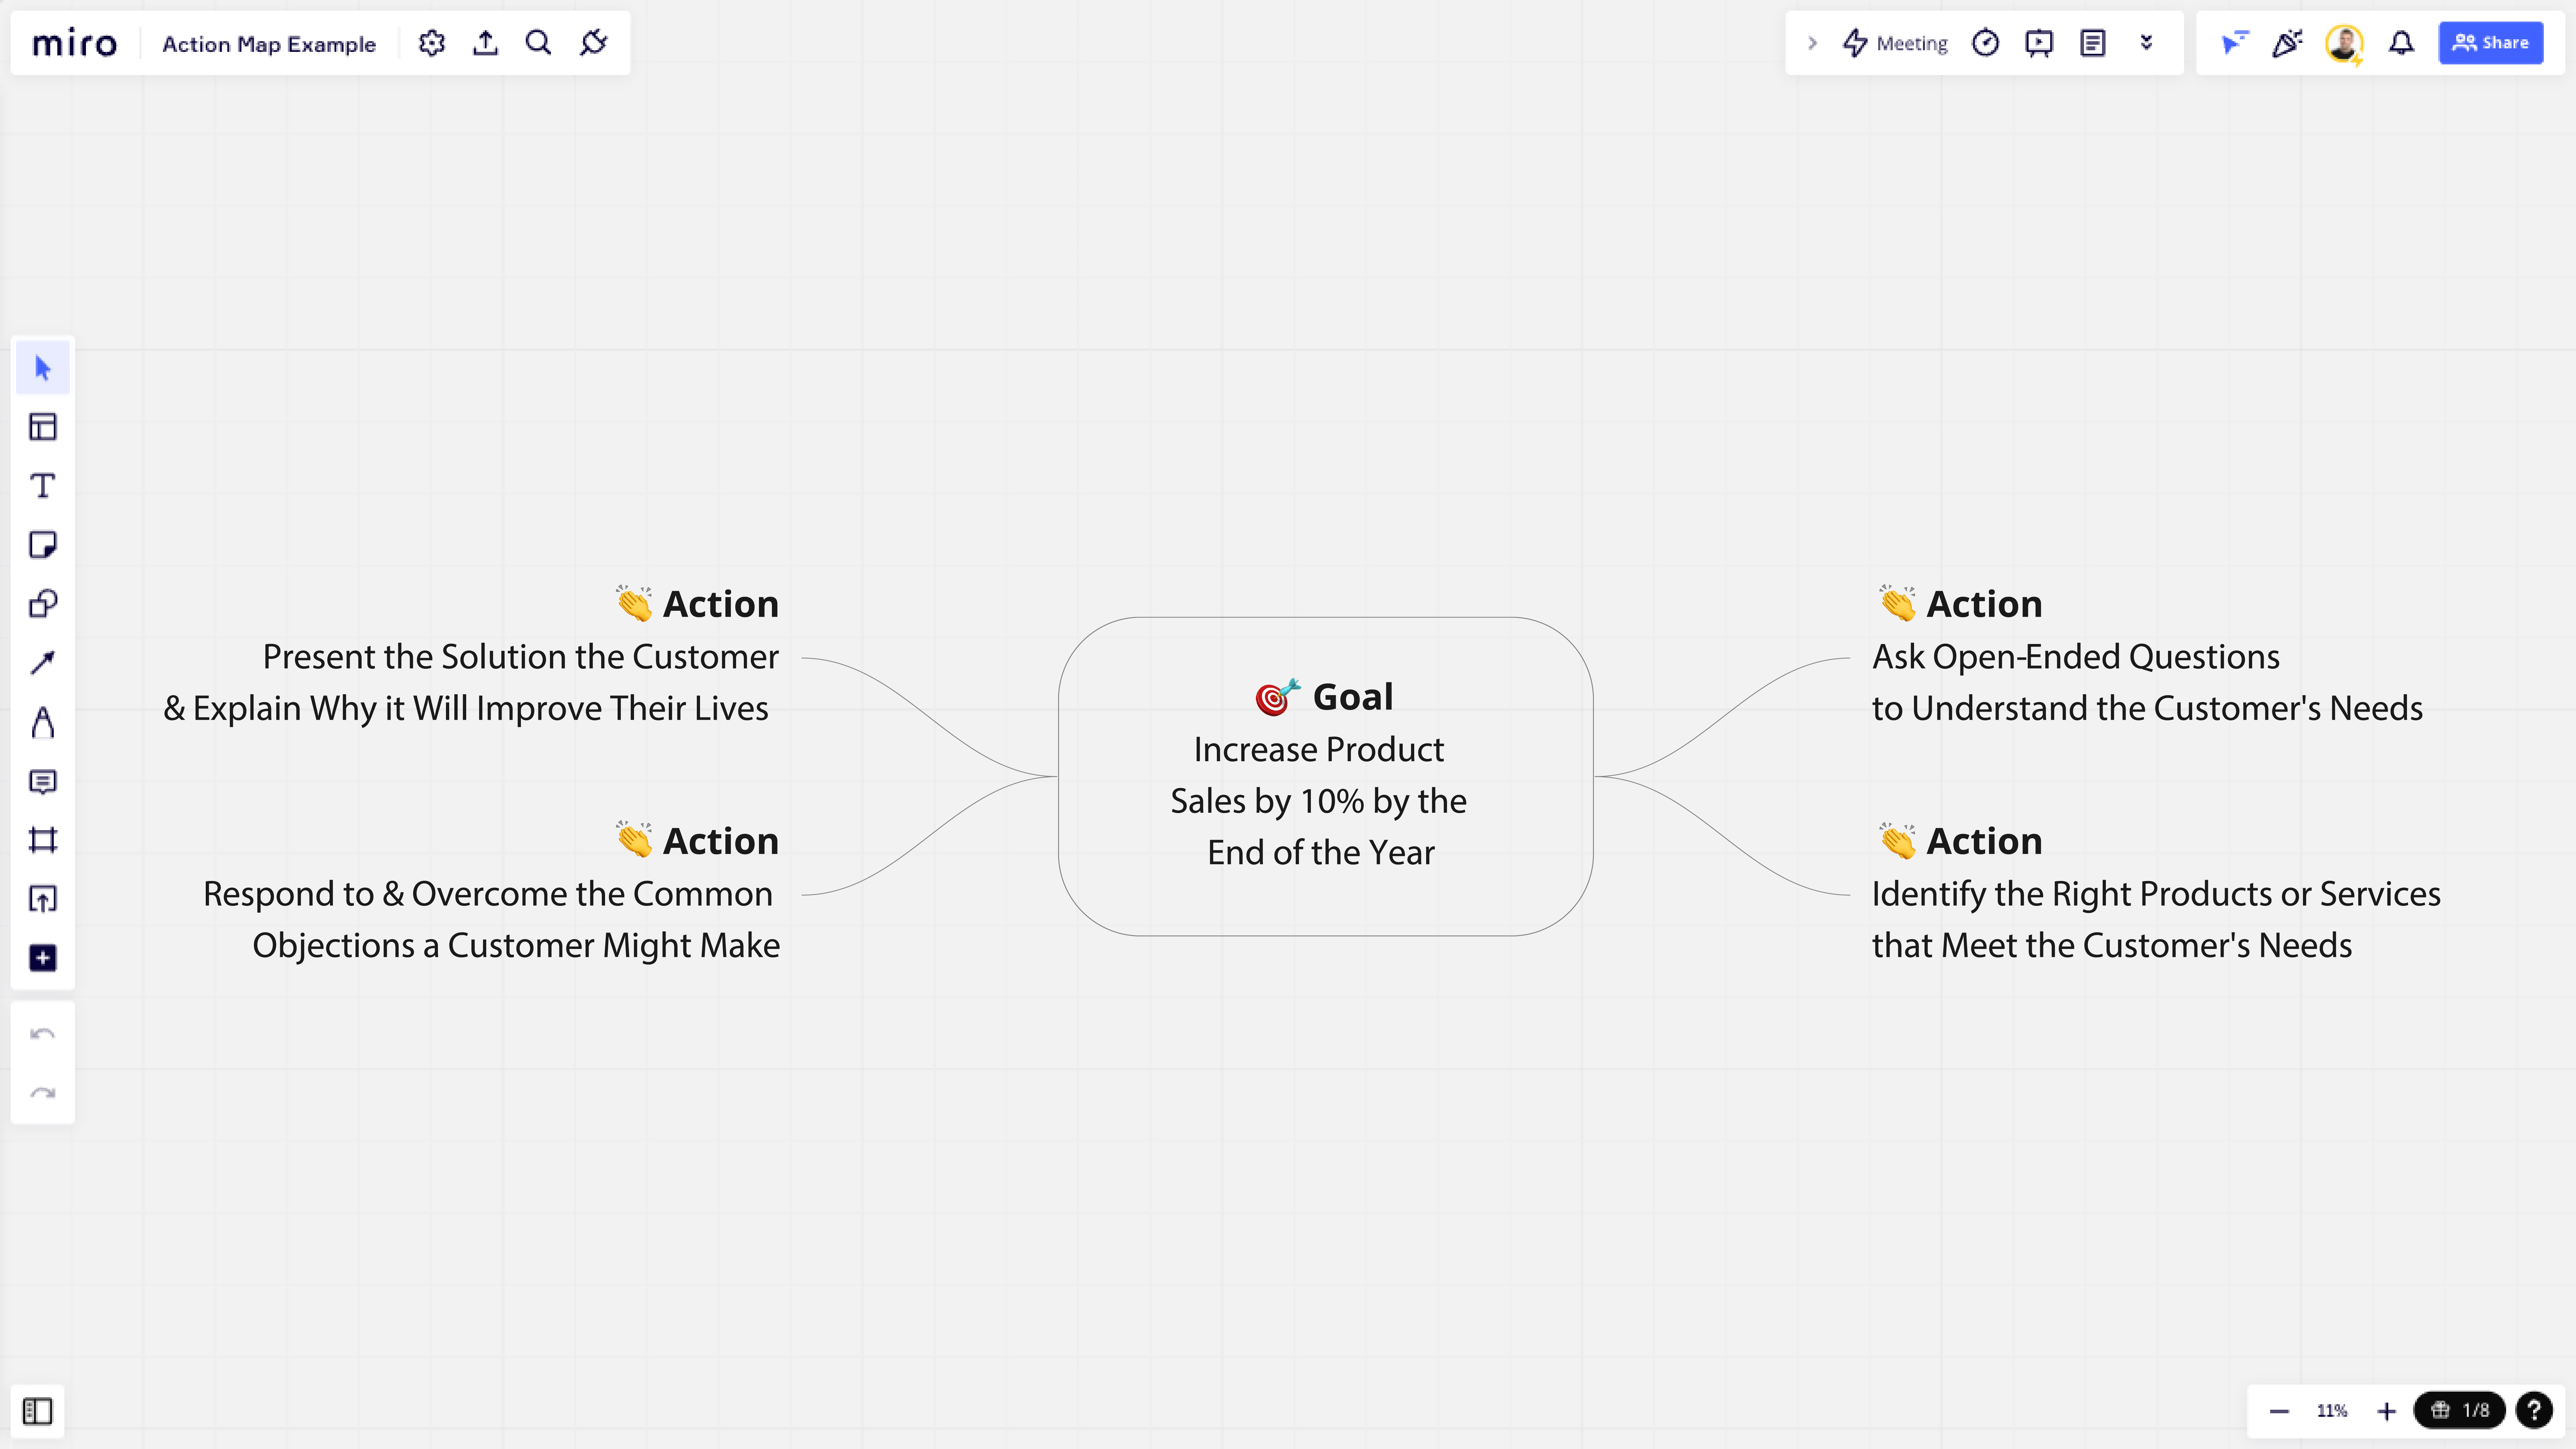
Alright! So, after you identify the measurable business goal you’re seeking to achieve, the second step in creating an action map is to identify the actions, behaviors, and tasks we need our learners to perform in order to achieve the business goal at the center of our map.
So, how do you go about identifying all of the actions, behaviors, and tasks? Well, once again, this is where you need to work with and rely on your stakeholders and subject matter experts to help you fill in the gaps. This is a great opportunity to have them walk you through the process and collaborate on filling in this part of your action map.
If we return back to our sales training project, our goal is to increase product sales by 10% by the end of the year. What action do our learners need to take in order to make these goals happen? Well, it might mean sales employees need to:
Ask open-ended probing questions to better understand a customer’s needs.
Identify the right products or services that meet the customer’s needs.
Present the solution to the customer and explain why it will improve their lives.
Respond to and overcome the common objections a customer might make.
So, as you look at this list of actions, notice how they’re not focused on what the learner needs to know, understand, or be aware of; instead, they are specific, tangible, and observable actions that learners need to take on the job, which are all measurable by the goal at the center.
Now, before we move on to the third step of creating an action map, what should you do if you’re working on a project without a subject matter expert and/or on a topic you know nothing about? Well, this is another common challenge that you might experience when creating an action map. Even when you’re not working with a subject matter expert to identify all of the actions, tasks, and behaviors, there’s a lot you can do to figure all of this stuff out.
Here are some options for identifying actions on your own:
For starters, if you can, it’s always beneficial to observe those learners who are performing at the desired level of performance. See what they’re doing and use that as the basis for identifying the behaviors.
You can also reference any documented best practices or procedures (assuming they exist). If so, you can use these to help you list any actions or behaviors.
And finally, you might consider conducting a task analysis, which is a process for analyzing a specific procedure and breaking it down into tasks and sub-tasks to clearly document and outline how a specific action is completed.
Step Three: Design the Practice Activities
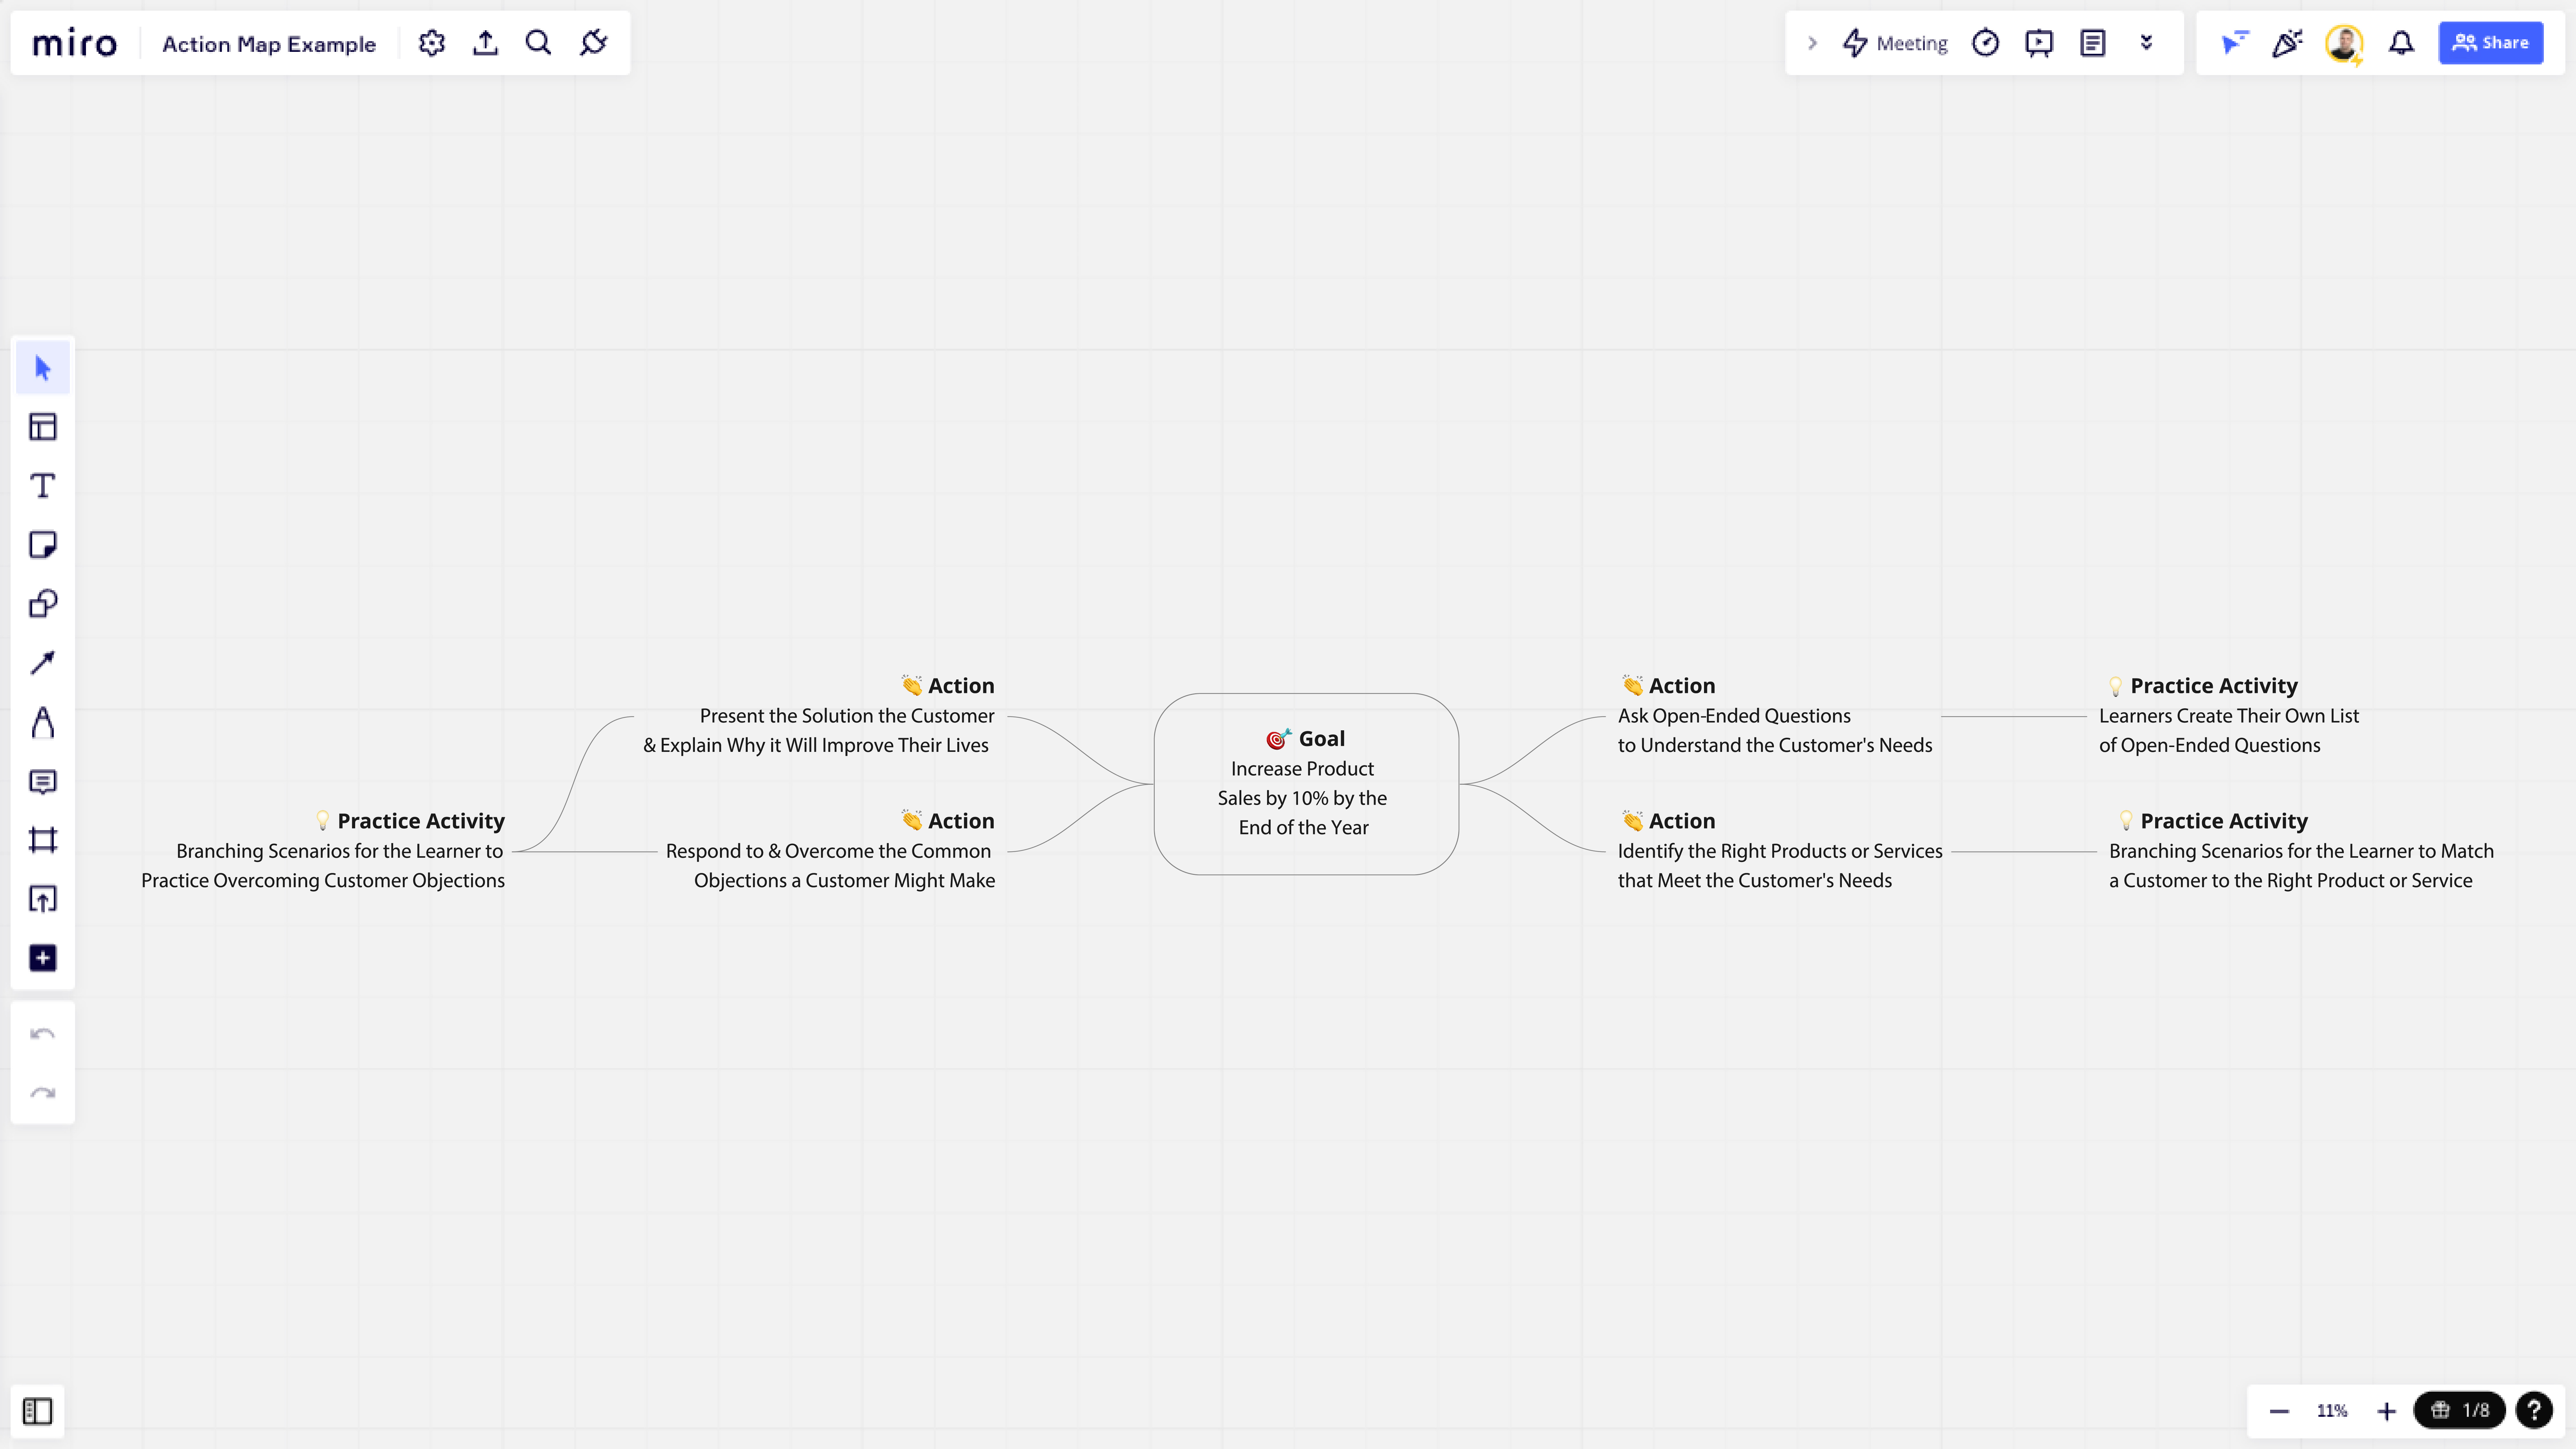
After defining the business goal and identifying the actions learners need to take to achieve that goal, this brings us to the third step for creating an action map, which is to design and ideate on the practice activities we might create to help learners put our listed actions into practice.
Remember, when we talk about adult learning theory, a major component involves putting things into practice rather than just receiving information. And so, this stage in the action mapping process is where we start to think about how we can design an experience to help our learners do just that.
Now, it’s important to mention that this stage isn’t about limiting yourself to specific types of training objects you might create (like an in-person workshop or an interactive eLearning course). The goal here is to be modality agnostic and ideate on any possible practice activity you might create. It’s usually not until later in the design process that you start narrowing in on which specific modalities are most fit-for-function for your project.
So, if we return to our sales example, what are some practice activities we might create to help learners put these actions into practice? Well, practice activities might include having learners:
Create their own list of open-ended questions they can use when interacting with customers.
Complete several branching scenarios where they match a customer to the right product, depending on what information the customer presents.
Participate in a series of role-playing interactions where they have to practice overcoming common customer objections.
Now, is there more we could list here? Of course! The goal isn’t to be 100% comprehensive of every practice activity you could possibly create but rather to list enough options to give you flexibility later when you start to narrow all of this down into the specific modalities that you’ll end up using.
Step Four: Identify the Necessary Information
Okie dokie! This finally brings us to the fourth and final step in the action mapping process, which is to identify the minimally necessary information that learners need to know in order to complete the practice activities we designed in the previous step.
Now, as I’ve already emphasized, knowledge and behavior aren’t mutually exclusive. And just because your learners know things, it doesn't mean they’ll do things. And so, when it comes to identifying the minimally necessary information, the goal here is to only list the information that is needed in order to complete the practice activities we’ve outlined earlier.
So, for example, if we want learners to be able to ask open-ended questions to uncover customer's needs or how to overcome common objections to our products, then maybe the information we need to provide is a list of example open-ended questions and responses they can use when presented with common objections.
The goal here is to avoid information that doesn’t have a direct link back to our business goals. This includes fun facts, product history, or anything else that doesn’t have a direct effect on achieving our desired goal—in this case, increasing sales numbers. And this is an excellent way to help you strip out any nice-to-know information from your training content.
What’s Next After Creating an Action Map?
So, after you’ve created your action map, what happens next? Well, as I mentioned earlier, action mapping is usually the first step in the design process, and its goal is to help you ideate on the types of training you might create.
So, in terms of next steps, this would include:
Write Your Learning Objectives: The wonderful thing about action mapping is that by the time you’re done, your learning objectives will practically write themselves. If you’re someone who prefers to write terminal and enabling learning objectives, you’ll notice that the goal at the center of your action map is basically your terminal objective, while the actions surrounding your goal make up your enabling objectives.
Design a Blended Training Solution: After you’ve defined your learning objectives, you can then determine what specific modalities you’ll use to create the practice activities from your action map. Ideally, depending on the situation and the scope of the project, this means designing a blended training solution that is fit-for-function for your project, your learners, your desired outcomes, etc.
Create a Design Document: Finally, after you define your learning objectives and modalities, you’ll then want to organize it all into a formal design document and present it back to your stakeholders and subject matter experts for approval before moving into the development phase.
Action Map Examples, Tools, & Templates
Now, before we wrap up this article on creating an action map, you might be wondering what tools or templates you can use to create an action map, along with examples. The truth is, you are free to use any tool you’d like to create your action maps. For example, if I’m creating an action map in collaboration with a subject matter expert, it might involve a whiteboard and some sticky notes. And in other instances, I might choose to use an online whiteboard or collaboration tool like Miro.
Feel free to click here to see the action map example I walked through in this article, and click here to use this free action map template (created in Miro) to start creating your own.
The Bottom Line
Okay! So, that’s a step-by-step overview of how to create an action map, along with an example and template. Taking the time to create an action map in partnership with your stakeholders and subject matter experts lets you move forward in the creation of your training with a clear understanding of the goal you’re trying to achieve, what actions need to be taken to achieve that goal, and the best way to train learners on those actions.
So, what do you think? How have you used action mapping in the design of your training solutions, and what other tips would you have? Share your thoughts by commenting down below!